Organic Seed Potatoes are here at Job’s Nursery, Spring 2026
Seed Potatoes have arrived and Job’s has a fun selection of varieties to play with in your potato growing endeavors.
Read MoreHelping Tri-City Gardeners Grow Since 1940!
Job's Nursery LLC is a family owned nursery and tree farm that offers a wide selection of outdoor plants that are hardy for our area. We are located just north of Pasco on Columbia River Road. It's a short trip to a beautiful location to escape the hustle and bustle of your everyday life.
Seed Potatoes have arrived and Job’s has a fun selection of varieties to play with in your potato growing endeavors.
Read More
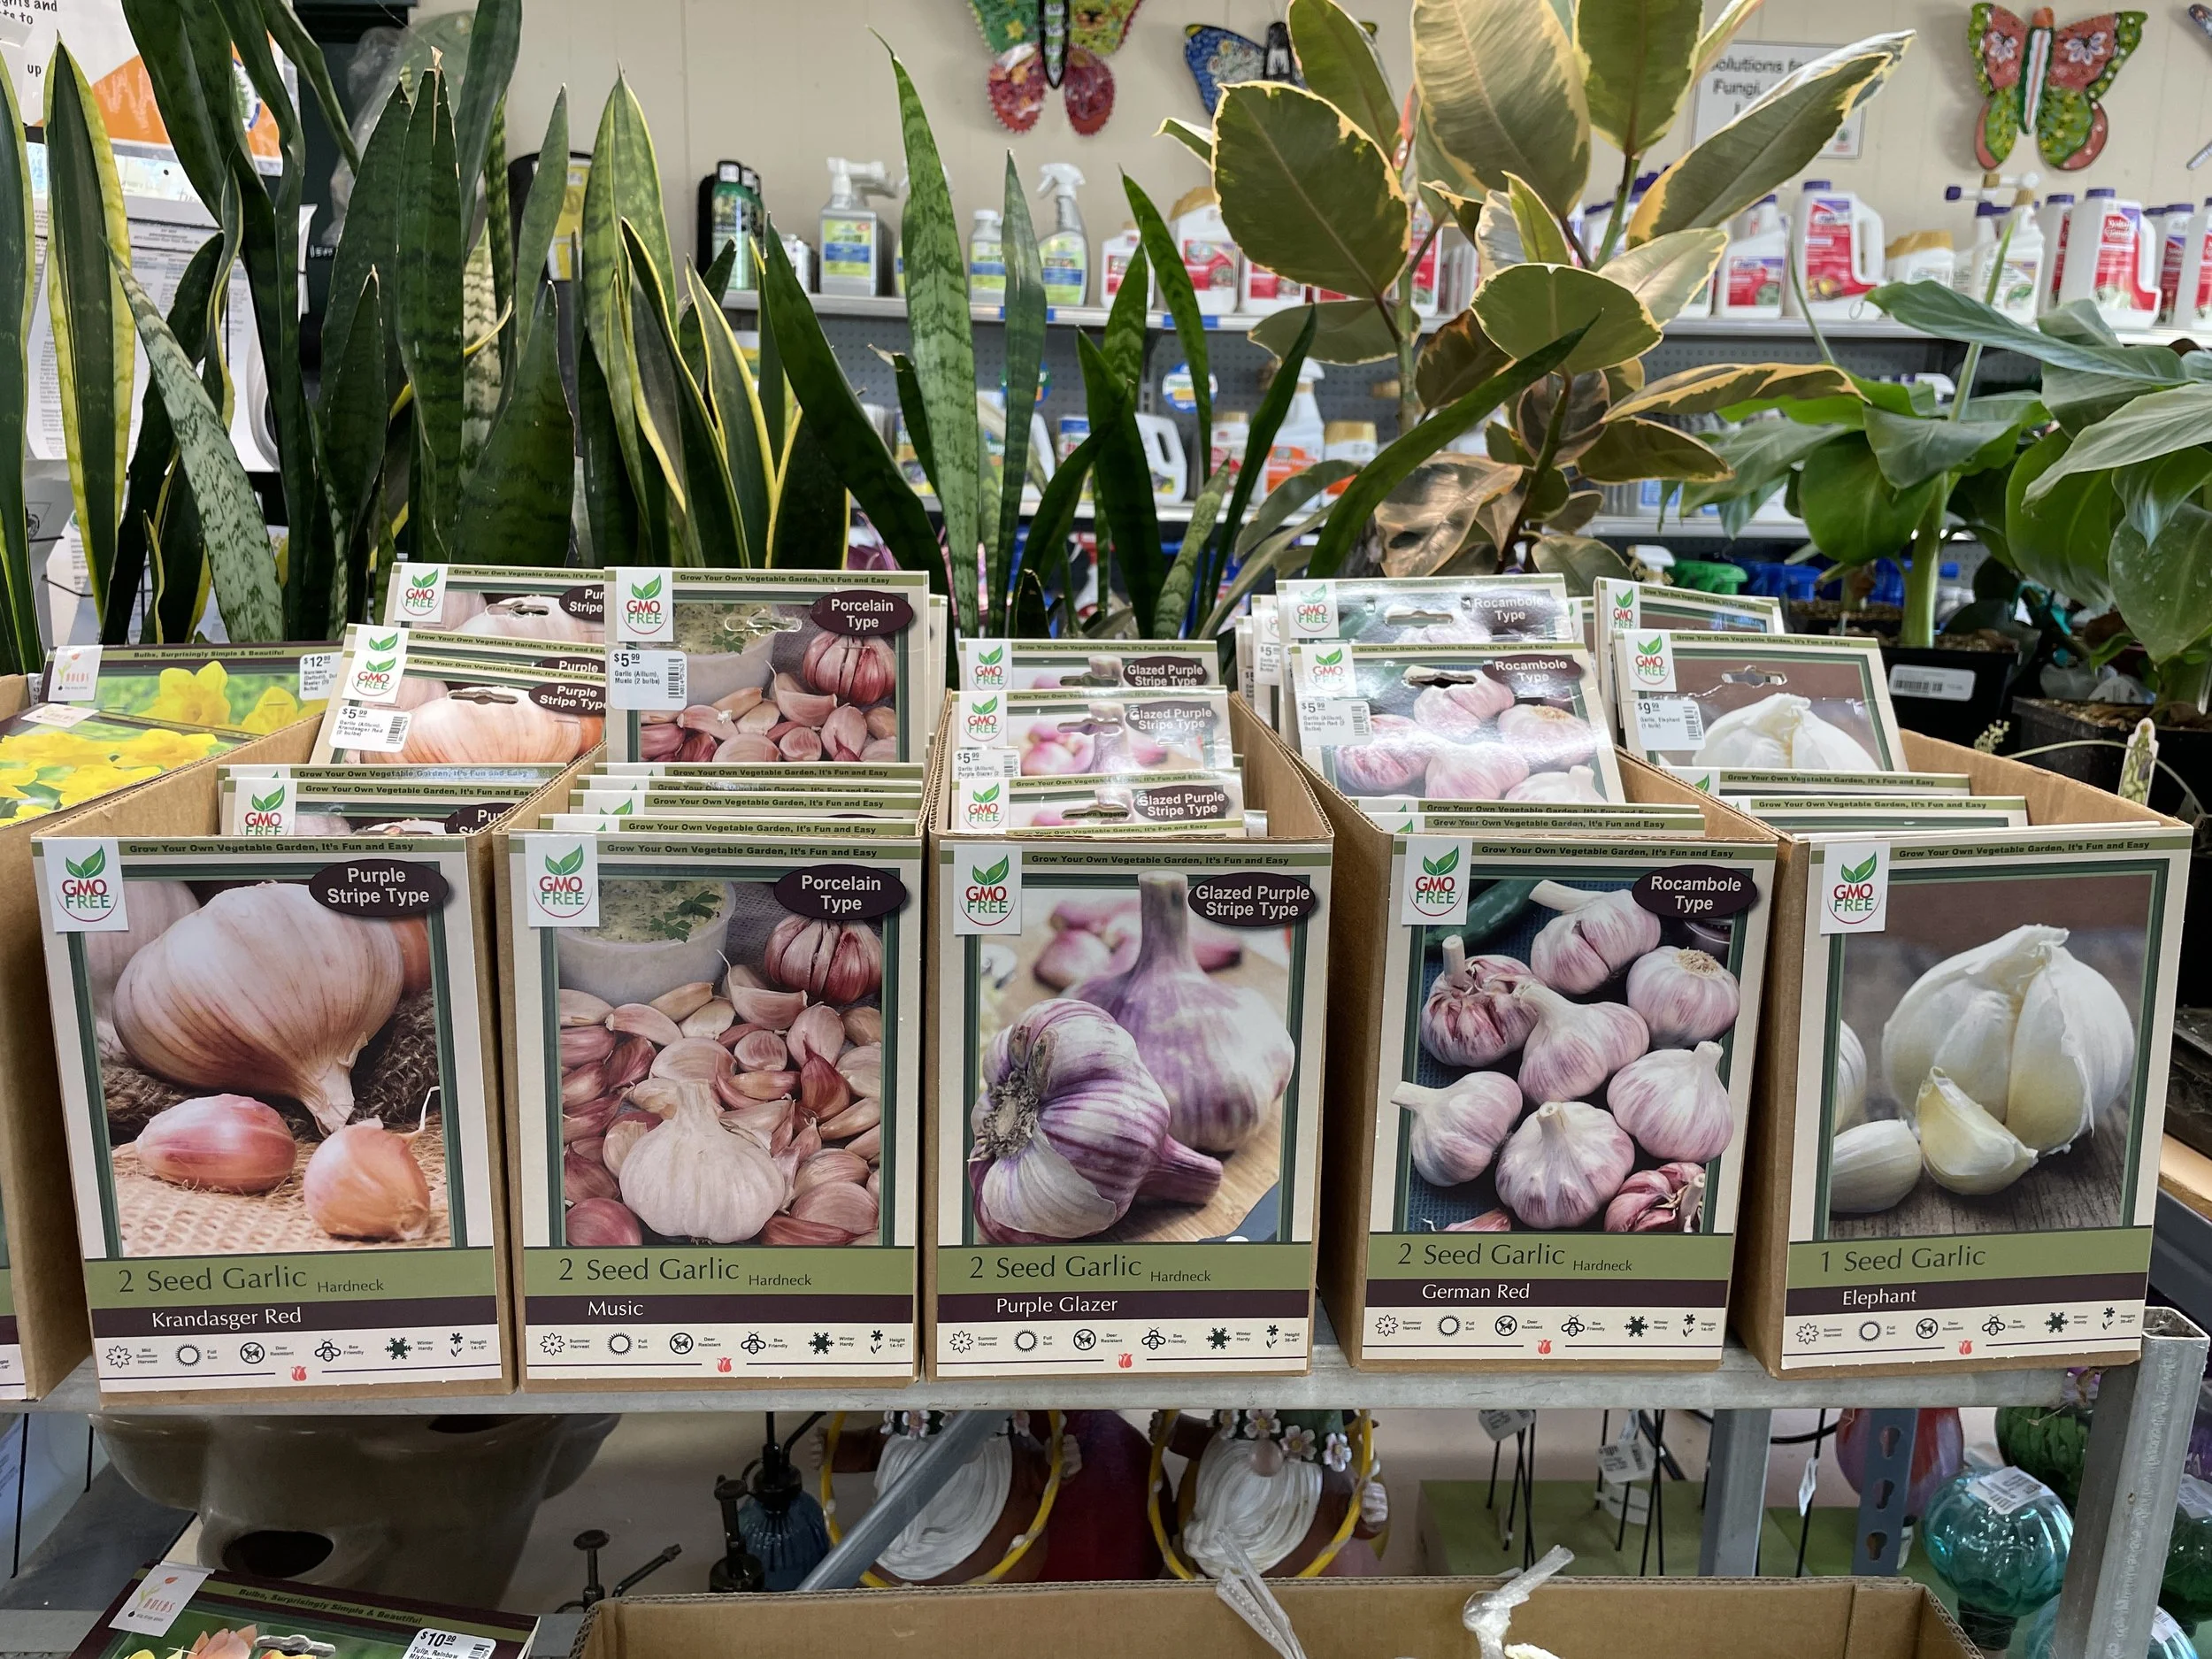
Photo of our current garlic selection.
Our 2025 Hard Neck Garlic has arrived. Great for planting this month. Click to learn more about the varieties we offer and tips on growing garlic.
Read More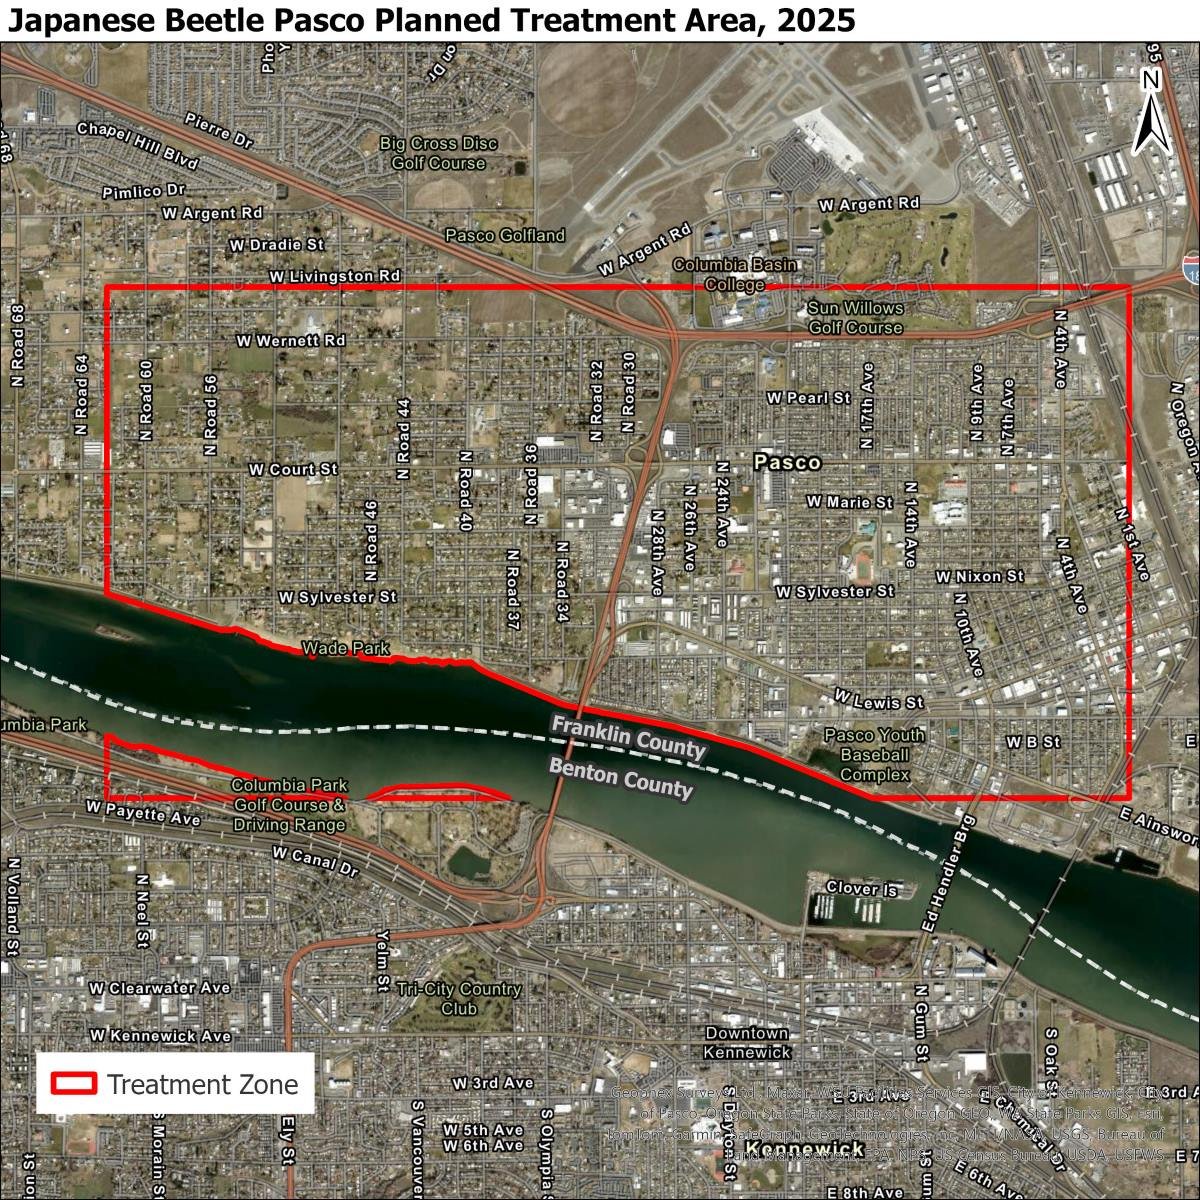
In the last several years Japanese Beetle has been detected and spreading in our local area. The Washington State Department of Agriculture has been working on educating the public, trapping and eradicating this pest. Like last year, they are offering free treatments in the identified areas like the above picture of Pasco and Kennewick as well as the Grandview, Wapato and Sunnyside communities.
Why is Japanese Beetle Bad?
Japanese Beetle is a pest with a voracious appetite for agriculture crops like grapes, hops, apples, cherries, peaches, corn and nursery stock. For the home garden they enjoy roses, backyard crops, fruit trees, many shrubs and the lawn. If it establishes itself in farms and nurseries, then those companies will have to do special treatments and get certifications in order to move their products out of the treatment or quarantine areas. This would raise the costs of those items and could lead to higher prices or the closure of those businesses.
What can be done?
If you are in a treatment area in Yakima, Benton or Franklin Counties, give consent to let the WSDA have a licensed applicator apply a larvicide to your property. This will kill the larva beetles before they emerge from the soil as adults and begin to multiply.
If you see an adult or think you do, report it.
Don't remove sod, soil or plants from a treatment area. That's how it spreads to unaffected areas.
If you live in the treatment areas, they should have or will be sending a post card with a PIN number that you use to sign up for treatment. If you lost your PIN, can call 1-800-443-6684 or email pest@agr.wa.gov.
For more info here are some links.
How to Identify Japanese Beetle
Fall is for planting garlic. We have several hard-neck garlic varieties to meet your culinary aromatic needs. Click to learn more about hardneck garlic, planting tips, and what we have for selection for the fall of 2023.
Read More
October brings the end to the irrigation water season, and we wanted to share when several of the local irrigation districts are ending the irrigation water season and some tips for your landscape to make it through winter better.
Irrigation Districts
Benton Irrigation District Oct 13th
Badger Mountain Irrigation District Oct 20th
Columbia Irrigation District Oct 13th
City of Pasco Irrigation Oct 16th
City of Richland Irrigation Oct 16th
East Columbia Irrigation District Oct 23rd
Franklin County Irrigation District Oct 23rd
Kennewick Irrigation District Oct 11th
South Columbia Irrigation District Oct 23rd
Before the water goes off
-Ensure everything in the yard gets a good drink; nothing is dry or wilting.
-Deep soak evergreens, and then make a recurring phone/calendar reminder to check the evergreens once a month through March.
-Make a fix list to repair before spring if sprinklers or valves are leaking, broken, or haven’t worked correctly.
-Review this list of plants that do well getting a drink in winter.
After the irrigation, the irrigation water is off.
-Clean your filters. That way, they are good to go in spring.
-Get your sprinkler lines blown out
-Disconnect your hoses from outdoor faucets
-Drain garden hoses when not in use
-Clean your sprinkler screens, inspect the sprinklers for wear and tear like springs, nozzles, or threads repair if needed
-Put your irrigation timer either in standby mode or off, depending on model or brand recommendations for winter storage. There is no need to have your valves turned on and off all winter.
-Consider upgrading your irrigation timer if it’s hard to program for modern smart controllers that use phone apps for programming vs the mystery dial.

Here is where to recycle your Christmas Tree in Pasco.
Read More
Here the simple steps to turning off the Saturation Skip Feature on a Rachio Irrigation Timer and why this feature can be a problem.
Read More
With the snow soon to begin melting with warmer temps, fortunately you haven’t missed out on too many garden activities, you just going to have to be ready to do some of the chores in a quick fashion because it’s going to change quickly when it does.
Prevention Spraying with Dormant Oil and Copper Fungicide as long as the buds are hard and it’s a day above 40 you can still spray with the dormant rates on the label. If you miss it follow labels instructions on what to do for the different stages of growth for the plants you are spraying for.
Applying Crabgrass Control. You actually have a lot of time for this as in before May. In fact it would be easier to apply and activate when the irrigation water comes on in April vs applying it when the Forsythia bloom and timing it with rain to activate it.
Dormant Pruning for Roses
This can be done as long as the leaf buds have not begun to pop. The basics for pruning roses are to cut them back to 2 feet then remove diseased, damaged, dead and crossing canes. For climbing roses, go ahead and leave tall just remove the diseased, damaged, dead and crossing canes.
Dormant Pruning Fruit and Berries
This can also be done while the buds are hard. To check this you want to feel the bud with your finger. If it’s hard and doesn’t give or squish under light pressure you are good.
Fertilizing your lawn, trees, shrubs and perennials.
Feeding your plants is a good thing but wait until April like normal because the plant will be awake enough to feed upon the fertilizer as well it is easier to water in with your watering systems.
Cutting back ornamental grasses
Cut them down as soon as the snow melts because once it warms up enough they will begin to grow again for the season and you will only be able to cut them back to as far as they have emerged to.
Cutting back perennials
Either pull off the dead material with your hand or cut it down. Unlike grasses it easier to see the new foliage emerge that you work around it and completely remove all the dead stuff.
Spraying weeds
Round up, Burn Out and other similar herbicides actually work best when temps are in the sixties, so there is plenty of time for this. No need to jump the gun. If the winter weeds are bothering you too much, you can always pull or hoe them out after the snow has cleared.
Applying Pre-emergents
This can be down actually any time of year but it is easier to do when the water is on to water the product in. Just remember to weed or spray the area really good beforehand.
Planting trees, berries and fruit trees
Your time will be short for bare root stuff but potted and B&B trees you have plenty of time.
Planting shrubs and perennials
Most of these plants are potted and can be planted year round. So once the ground is workable again until it’s over 90 you can plant these.
Planting annuals
Annual flowers like petunias and marigolds its best to plant those more toward May when the ground warms up. Primroses and pansies would be good to plant when the snow clears.
Here are some videos on pruning berries going into spring. Enjoy!
A common question we get is when to prune your grasses for winter. In reality it can be as soon as that plant dies back to the ground. I personally use the grass’ foliage as a winter interest, so I will wait until the winter winds beat then up into a mess. Then I tie a string around the top and cut back to within an inch or two of the ground. For evergreen grasses, I just clean out the dead foliage. With Pampass grass, I wait until spring, using it’s foliage as a mulch to help it survive winter since it’s more tender than other grasses like Switch grass, Japanese Silver grass or Fountain grasses in our area. Below is a video I did to demonstrate how to cut back the different types of grasses.
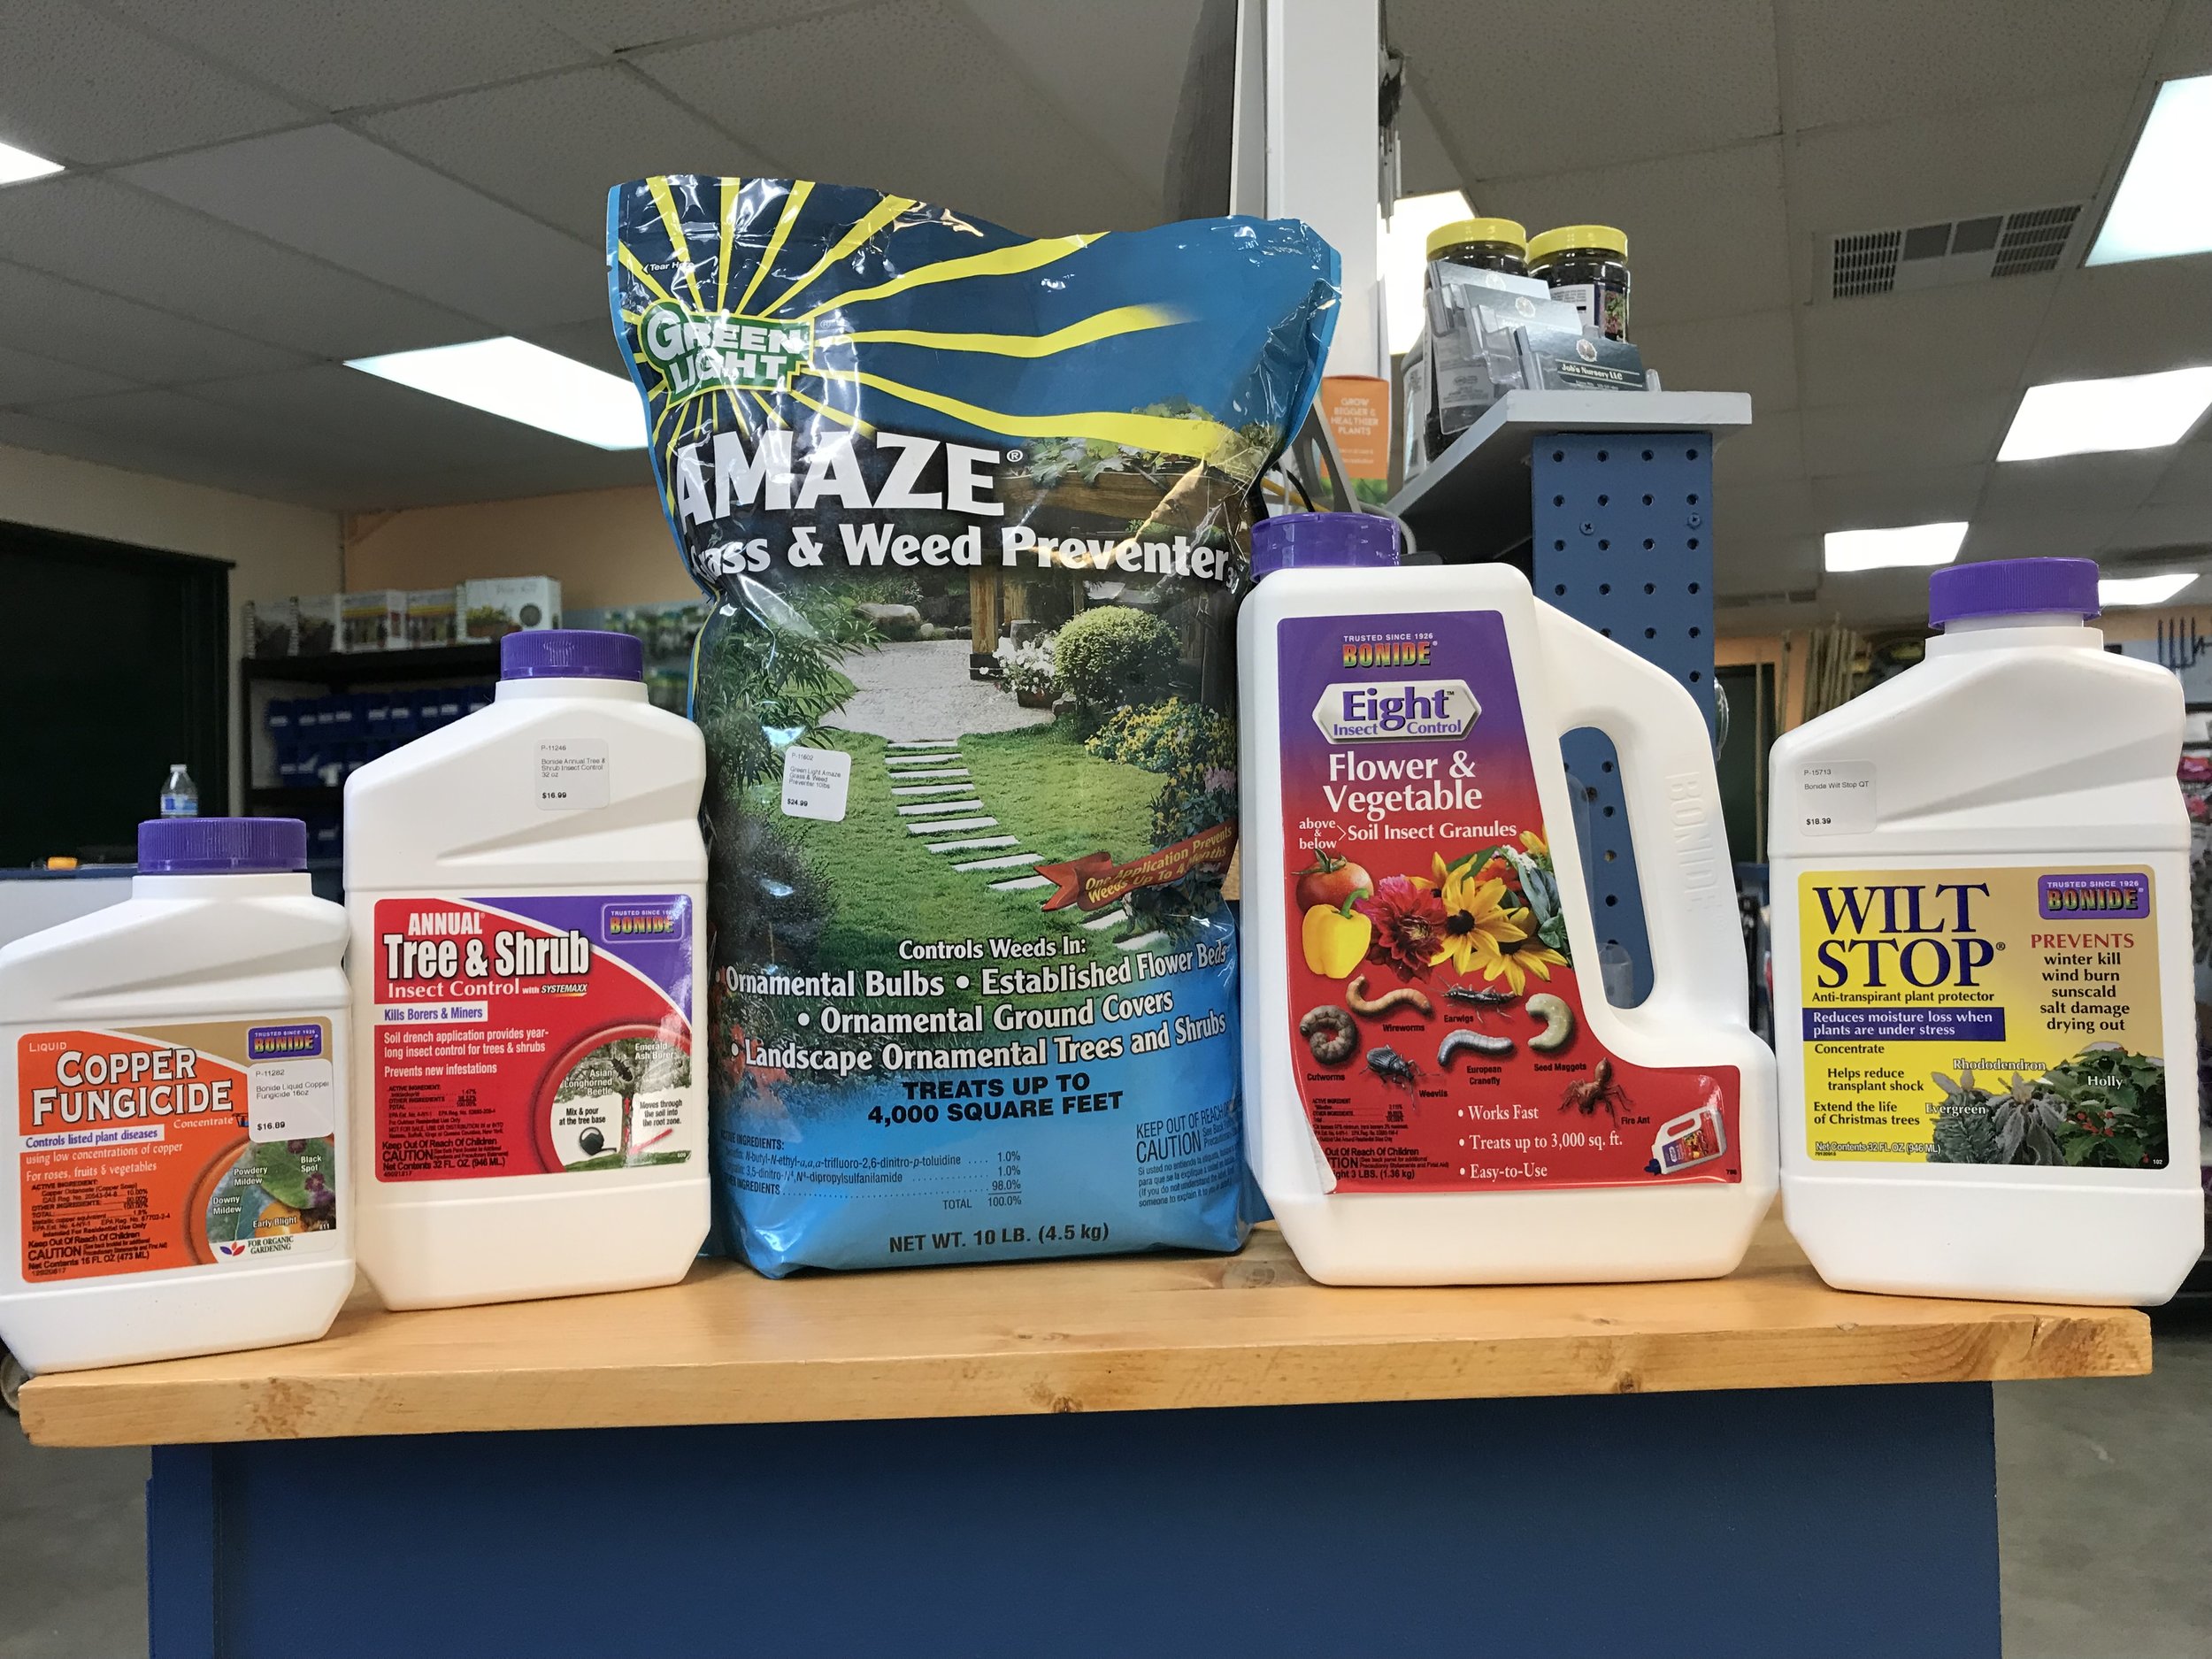
Fall is a great time to start spring off right, be doing a few preventatives.
1. Prevent aphid problems with the Bonide Annual Tree and Shrub Insect Control. By applying in August/September this gives the insecticide time to move up the tree and prevent attacks in Spring.
2. Prevent weeds in from growing in winter and early spring by applying a pre-emergent herbicides. Pre-emergent herbicides prevent weed seeds from germinating. Applying now, after clean weeding a flower bed will help prevent winter weeds from germinating and popping up in early spring. Products to look into are Greenlight Amaze, Preen, Round Up Extended Control. Make sure to follow their watering instructions on these product's labels for best results.
3. Prevent drought stress by applying Bonide Wilt Stop to your soft needle and broad leaf evergreens. It works like like lip balm for our lips to keep their leaves from drying out. Also mark when to water your evergreens in your calendar, it would be best to set it to once a month November through March. Use a sprinkler on a hose to water since the irrigation is turned off at that time of year. Yews, photinia, boxwoods, arborvitae, rhodies and others benefit from a monthly drink.
4. Help gain an upper hand with root weevil, by applying Bonide Eight Granules to kill the overwintering larva in the soil, thus reducing their population to help to keep them in check next year.
5. Green up your yellow trees and shrubs that normally should be green by applying the G&B Acid Planting Mix and G&B Harvest Supreme as a mulch or top dressing. By putting about 2 inches thick to slowly leach nutrients into the soil over winter and spring to catch these plants up on nutrients.
6. Clean up disease issues by spraying areas of the yard that had disease issues like rust, powdery mildew, leaf spot, peach leaf curl in November or February with a dormant application of Bonide Liquid Copper Fungicide. This sanitizes the plants to give a fresh start next spring. For best results make sure to clean up the diseased leaves as well as when you spray, spray the entire plant including the trunk.
7. Get your lawn off to a great start in spring by applying a fall feeding of a Fertilome Winterizer or Fertilome Greenmaker in September/October. These fertilizers will slowly feed throughout winter to build up the lawns nutrient reserves for a lush push of green growth in spring.

June is the best month to determine the light exposure (generally referred to as exposure) in your yard because it's has the longest days and the sun is at highest angle. By checking now you can better account for hot, sunny summer days that can wreak havoc on shade loving plants or help heat lovers thrive. It also a good idea to check your exposure every couple of years to account for tree growth or other changes.
Here are the steps to checking your exposure.
1. Download our Exposure Chart.
2. Name the different beds you want to track on the chart.
3. On a leisure day at home, check every hour or so, particularly in the afternoon and fill in the circle for that hour if the bed is shaded.
4. Once it's all filled out you can now research plants online or at the nursery. You are welcome to show our staff the chart and we can show plants as well.
5. Now plant your new landscape additions when you have time or best luck and watch them thrive.
Scale is a sap sucking insect that resembles an oyster shell that either cover branches like the tree pictured above or on the foliage of arborvitae. They can be challenging to control for when their shells are soft, insecticides work; when they are hard they do not. For deciduous trees you can use a systemic insecticide like the Bonide Annual Tree and Shrub insect control. For evergreens it would be better to use a horticultural oil like Bonide All Seasons Oil or Malathion to kill the scales.
An few signs you have scale is if you see shells on branches (not normal), the foliage is sticky or there are a lot of flies hanging around you plants (this also is a sign of aphids too).

Bermudagrass is problem for a lot of Tri-City lawns. It is the grass with deep roots and runs it's tendrils throughout the yard spreading where ever it feels like it. Bayer has come out with Bermudagrass Control for lawns, it is a growth regulator that supresses the growth of the Bermudagrass and lets your preferred lawn to choke it out. Timing is critical on applying it, you want to hit the Bermudagrass when it begins to emerge in early April, then repeat applications on a monthly basis until it is no longer trying to grow. Easy to apply with the Read to Spray Bottle (RTS), just hook to a hose and begin spraying only the affected areas of the lawn. Be sure to let the product dry completely after application, before letting kids or pets back on the lawn. We stock it regularly here at Job's.

This is my thought process on when to yank a rose bush if it has bolted.
Read More
While we don't offer U-Cut trees, here is some information on how to have an adventure getting one from the Umatilla National Forest.
Read MoreDifferent types of grasses need different types of winter clean up. Alex with Job's Nursery walks you through the different types and how to clean them up.
Read MoreThe Bald Cypress, Larch and Dawn Redwood look like they are dying in the fall, don't worry it's normal, because they are not really evergreens.
Read More
Google Maps is a wonderful tool for directions but did you know if use it to measure distance?
The answer is yes, yes you can if you house is a couple years old. Simply go to maps.google.com and type in your address. Then click over to satellite view to see you yard details. Then with your mouse or track pad, right click and select "Measure distance." When a white dot appears, drag it to where you want to start your measurement like your house, click then drag the second white dot to where you want to plant the tree. This gives you the distance. Now you can do your research on trees based on their diameter. A tree is best planted half it's diameter away from homes, buildings or pools.
Starting the garden or refreshing the garden starts before you buy a seed or transplant.
Place the garden in a space that is in a sunny spot, afternoon sun is best.
Written by Alex Job